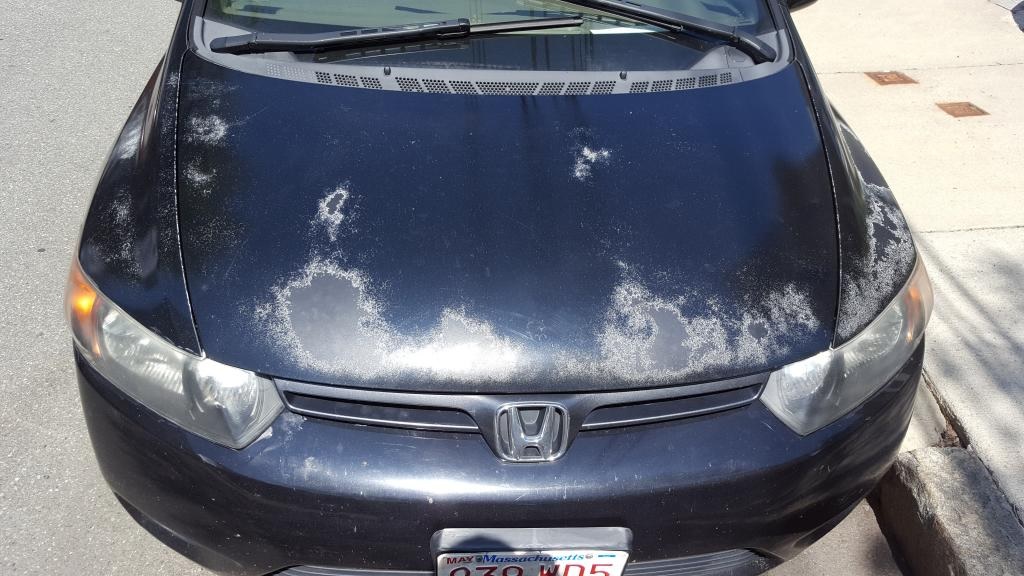
Clear coat, a protective shield against the elements, contributes significantly to the longevity and aesthetic appeal of various surfaces. But what happens when the once-vibrant sheen starts to fade, leaving your prized possessions looking lackluster? The burning question persists: “Can clear coat be reapplied?” In this in-depth guide, we embark on a journey to explore the nuances of reapplying clear coat, offering a step-by-step roadmap for breathing new life into your surfaces, whether it’s a beloved vehicle, weathered furniture, or any other cherished possession.
The Essence of Clear Coat Reapplication
Before delving into the practicalities, it’s essential to grasp why clear coat reapplication is a necessary endeavor. Over time, exposure to sunlight, harsh weather conditions, and everyday use can take a toll on the protective clear coat layer, compromising its integrity. The result? A diminished protective barrier that not only impacts the aesthetics but also leaves surfaces vulnerable to damage.
Signs Indicating the Need for Clear Coat Refresh
Recognizing the signals that your surfaces are in dire need of a clear coat intervention is pivotal. Keep an eye out for visible signs such as peeling, cracking, or an overall dull appearance. These indicators serve as an alarm, signaling that your once-impenetrable shield is now in need of reinforcement.
A Detailed Walkthrough of Clear Coat Reapplication
1. Thorough Surface Preparation
The success of any clear coat reapplication lies in the meticulous preparation of the surface. Begin by cleaning the surface thoroughly to remove dirt, grime, and any remnants of the existing clear coat. Once clean, sand the surface to create a smooth texture, ensuring optimal adherence of the new clear coat.
2. Selecting the Right Clear Coat
Not all clear coats are created equal, and the key to a successful reapplication lies in choosing the right one. Factors such as compatibility with the surface material and the intended use should guide your selection. Seek advice from professionals or refer to the manufacturer’s guidelines for the best results.
3. Masking and Protecting Surrounding Areas
Precision is paramount in clear coat reapplication. To avoid unintentional damage to adjacent areas, use masking tape and protective covers to isolate the specific region receiving the new clear coat. This step ensures a focused application without the risk of unwanted overspray.
4. Mastering the Art of Application
Armed with a high-quality applicator, apply the clear coat evenly over the prepared surface. Take care to follow the manufacturer’s instructions regarding the recommended number of coats and drying times. Consistency and patience are the keys to achieving a flawless finish.
5. Curing and Drying: Patience Pays Off
Once the clear coat is applied, allow ample time for the curing and drying process. Rushing this step can compromise the effectiveness of the clear coat, leading to a less durable finish. Follow the recommended drying times to ensure optimal results.
Pitfalls to Avoid in Clear Coat Reapplication
In the pursuit of reviving surfaces, several common mistakes can hinder the reapplication process. Steering clear of these pitfalls is essential for a successful outcome:
1. Insufficient Surface Preparation
Rushing through the preparation phase can jeopardize the entire reapplication process. Take the time to clean, sand, and prime surfaces to create an ideal foundation for the new clear coat.
2. Ignoring Environmental Factors
Weather conditions significantly impact the success of clear coat application. Avoid applying clear coat during extreme temperatures or high humidity, as these factors can affect drying times and overall finish quality. (See Also: Are Maaco Paint Jobs Good? Unveiling the Truth About Maaco Auto Painting)
3. Neglecting Compatibility Issues
Ensure compatibility between the new clear coat and the existing layer, as well as the material of the surface. Incompatibility can lead to adhesion issues, compromising the overall finish.
Expert Tips for Successful Clear Coat Reapplication
Embarking on the journey of clear coat reapplication requires finesse and attention to detail. To ensure your surfaces receive the rejuvenation they deserve, consider these expert tips that go beyond the basics.
1. Invest in Quality Clear Coat
Opt for a clear coat with UV protection and a reputation for durability. Quality matters, and choosing a reputable product sets the foundation for a long-lasting and resilient finish.
2. Temperature Matters
Timing is crucial. Aim to apply the clear coat in moderate temperatures, avoiding extremes that can impact drying times and overall effectiveness. The Goldilocks zone ensures optimal results.
3. Test in an Inconspicuous Area
Before committing to a full application, conduct a small test in an inconspicuous area. This allows you to assess compatibility, adherence, and the final finish without risking the entire surface.
4. Consider Professional Assistance
If in doubt or dealing with a complex surface, seek professional advice or assistance. Experts can provide tailored recommendations based on the specific characteristics of your project.
5. Mind Your Environment
Choose a well-ventilated area for the clear coat application. Adequate ventilation minimizes the risk of fumes and ensures a smoother application process.
6. Avoid Overlapping Strokes
When applying the clear coat, maintain a consistent and even stroke pattern. Overlapping strokes can result in uneven coverage and compromise the overall aesthetic of the finished surface.
7. Follow Manufacturer’s Guidelines
The manufacturer’s instructions are your roadmap to success. Pay close attention to recommended drying times, application techniques, and any additional steps for optimal results.
8. Plan for Multiple Coats
While it might be tempting to achieve a quick finish, multiple thin coats are often more effective than a single heavy application. Building up the layers ensures better coverage and durability.
9. Be Patient During Curing
Allow the clear coat sufficient time to cure before subjecting the surface to regular use. Patience in this phase contributes to the longevity and resilience of the protective layer. (See Also: What happens if you paint over epoxy? A Comprehensive Guide?)
10. Regular Maintenance Is Key
Post-application, implement a regular maintenance routine. Cleaning and protecting the clear coat will extend its lifespan, keeping your surfaces looking pristine for years to come.
Clear coat reapplication is both an art and a science, and mastering the process involves incorporating expert tips that elevate your results. Whether you’re a seasoned DIY enthusiast or a first-time clear coat rejuvenator, these insights will guide you toward achieving a professional-grade finish that stands the test of time.
FAQs: Clear Coat Reapplication Demystified
Navigating the realm of clear coat reapplication can raise numerous questions, from the practical to the nuanced. Here, we address common queries to provide clarity and confidence in your surface restoration endeavors.
1. Q: Can I Reapply Clear Coat on a Surface That Already Has It?
A: Yes, you can. However, thorough preparation is crucial. Clean and sand the surface to ensure proper adhesion of the new clear coat.
2. Q: How Often Should Clear Coat Be Reapplied?
A: The frequency depends on factors such as exposure, usage, and the quality of the initial application. Generally, every 2-5 years is a good rule of thumb.
3. Q: Can I Reapply Clear Coat Without Stripping the Old One?
A: It’s not recommended. Stripping the old clear coat ensures a clean surface for the new application, preventing adhesion issues and ensuring a smoother finish.
4. Q: What Should I Do if the Clear Coat Starts Peeling After Reapplication?
A: Peeling can result from inadequate surface preparation. Sand the affected area, reapply the clear coat following proper steps, and ensure compatibility.
5. Q: Can I Apply Clear Coat in Humid Conditions?
A: It’s best to avoid high humidity. Excess moisture can affect drying times and compromise the finish. Choose a dry, well-ventilated day for optimal results.
6. Q: Is Clear Coat Reapplication Suitable for DIY Projects?
A: Yes, many DIY enthusiasts successfully reapply clear coat. Follow proper guidelines, use quality materials, and take your time for the best outcome.
7. Q: Can I Reapply Clear Coat on Faded Car Paint?
A: Absolutely. Reapplying clear coat can revive faded car paint. Ensure proper surface preparation and choose a clear coat suitable for automotive applications. (See Also: How Many Spray Cans Does It Take to Paint a Car? Expert Tips Revealed)
8. Q: How Long Does Clear Coat Reapplication Take?
A: The process includes surface preparation, application, and drying. Depending on the number of coats and drying times, it can take a few days to a week.
9. Q: Can I Wax Over a Reapplied Clear Coat?
A: Yes, you can wax over a reapplied clear coat. However, wait until the clear coat is fully cured to avoid any interference with the drying process.
10. Q: What Should I Do if Bubbles Appear in the Clear Coat After Application?
A: Bubbles can result from improper application or environmental factors. Sand the affected area, reapply the clear coat, and ensure proper drying conditions.
Embarking on the journey of clear coat reapplication often brings forth a myriad of questions. In this FAQ section, we address the most common queries, providing insightful answers to empower you in your quest for surface rejuvenation.
The Verdict: Transforming Surfaces with Confidence
In conclusion, the resounding answer to the question “Can clear coat be reapplied?” is a definite yes. Armed with the right knowledge, a methodical approach, and quality materials, you can turn back the hands of time and witness your surfaces regain their former glory.
Rejuvenating weathered surfaces requires time, effort, and attention to detail, but the results are well worth the investment. As you embark on your clear coat reapplication journey, view it as an opportunity to not only restore but also enhance the beauty and resilience of your cherished possessions.
Remember, each step in the process plays a crucial role in the final outcome. By taking the time to understand the intricacies and avoiding common pitfalls, you can confidently revitalize your surfaces, ensuring they stand the test of time with a renewed and vibrant allure.


