If you’ve ever worked with JB Weld, you’re probably familiar with its unmatched bonding capabilities. But what if you want to take your JB Weld creations to the next level? Can you add a pop of color and personality by painting over JB Weld surfaces? In this comprehensive guide, we’ll explore the possibilities and secrets of transforming your JB Weld projects into true works of art.
Understanding JB Weld
Before we dive into the realm of painting, let’s take a moment to understand JB Weld itself. This epoxy adhesive has gained a stellar reputation for its ability to create strong bonds between various materials. From repairing metal objects to crafting DIY projects, JB Weld is a versatile solution for countless applications.
Can JB Weld Be Painted?
Assessing Paint Compatibility
The good news is, yes, you can paint JB Weld! However, success hinges on your choice of paint. Different paints adhere to epoxy surfaces in varying degrees. Generally, oil-based paints exhibit superior adhesion compared to their water-based counterparts.
Surface Preparation
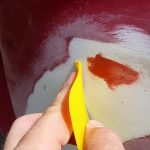
Creating a canvas for your paintwork is crucial. Start by thoroughly cleaning the JB Weld surface to eliminate any dirt, grease, or debris. Lightly sanding the surface not only cleans it but also enhances the paint’s ability to adhere.
Steps to Paint JB Weld
1. Selecting the Right Paint
Your choice of paint plays a pivotal role in the success of your painting venture. Opt for high-quality, oil-based paints known for their durability and compatibility with epoxy surfaces.
2. Primer Application
For a professional finish, apply an epoxy primer before diving into the actual painting. This step creates a bonding layer, enhancing adhesion and ensuring a lasting finish.
3. Painting Techniques
Mastering the art of painting JB Weld involves using the right techniques. Employ even strokes, maintain a consistent distance, and apply multiple thin coats rather than a single heavy one. Patience is key—allow each coat to dry thoroughly.
4. Curing Time
Resist the temptation to rush through the process. Let the paint cure completely before subjecting the surface to any stress or contact. This ensures a robust and lasting finish.
Tips and Tricks
1. Sand Between Coats
Achieving a smooth and flawless finish requires a bit of finesse. Gently sand the surface between paint coats to promote adhesion and create a seamless appearance.
2. Seal the Deal
Consider adding an extra layer of protection by applying a clear epoxy sealant over the painted JB Weld. This not only enhances durability but also adds a professional touch.
3. Experiment with Colors
While JB Weld can be painted in various colors, consider the practical aspects. Darker shades often provide better coverage, hiding imperfections more effectively than lighter hues. (See Also: How Many Turbo Cans to Paint a Car: A Comprehensive Guide)
Common Concerns
1. Peeling Paint
Encountering issues like peeling paint? This may signal inadequate surface preparation or the use of an incompatible paint type. Reevaluate your process and make necessary adjustments for a better outcome.
2. Choosing Colors
Don’t be afraid to experiment with different colors. JB Weld can be a canvas for your creativity, allowing you to personalize your projects with a wide array of hues.
Expert Tips for Painting JB Weld Like a Pro
Whether you’re a seasoned DIY enthusiast or a newcomer to the world of JB Weld projects, mastering the art of painting this versatile epoxy adhesive can elevate your creations to new heights. Here are some expert tips to ensure your JB Weld surfaces not only bond seamlessly but also dazzle with a flawless finish.
1. Choose the Right Paint
Selecting a high-quality, oil-based paint is the foundation of a successful JB Weld painting project. These paints offer superior adhesion and durability, ensuring your masterpiece stands the test of time.
2. Invest in Quality Brushes
The tools you use matter. Invest in good-quality brushes to achieve smooth, even strokes. Quality brushes make a noticeable difference in the final result, providing a professional touch to your painted JB Weld surfaces.
3. Mind the Temperature
Painting in optimal conditions is crucial. Aim for temperatures between 60°F and 75°F (15°C to 24°C) for the best results. Extreme temperatures can affect paint application and drying times.
4. Practice Proper Surface Prep
Prepare your JB Weld canvas diligently. Thoroughly clean the surface, removing any contaminants, and lightly sand to enhance paint adhesion. Proper surface preparation sets the stage for a flawless finish.
5. Apply Thin, Even Coats
Patience is a virtue in JB Weld painting. Instead of a single heavy coat, apply multiple thin coats. This not only ensures better adhesion but also prevents issues like drips and uneven coverage.
6. Allow Adequate Drying Time
Resist the urge to rush through the drying process. Allow each coat to dry completely before applying the next. This patience pays off in the form of a smooth, professional-looking finish.
7. Consider Clear Sealant
For added protection and a glossy finish, consider applying a clear epoxy sealant over the painted JB Weld. This extra layer enhances durability and provides a polished look to your project.
8. Test in an Inconspicuous Area
Before committing to painting the entire surface, conduct a small test in an inconspicuous area. This allows you to assess paint compatibility and adherence without compromising the overall project. (See Also: Is There A Raptor Liner Hardener Substitute? Exploring Alternatives for Durable Coatings)
9. Embrace Creativity with Color
While darker colors may be more forgiving, don’t shy away from experimenting with a variety of hues. JB Weld projects offer a canvas for your creativity, so feel free to explore different colors that suit your aesthetic.
10. Inspect and Touch Up
After the paint has cured, inspect the surface for any imperfections. Touch up areas as needed to ensure a flawless, professional finish that truly showcases your JB Weld masterpiece.
Incorporating these expert tips into your JB Weld painting endeavors will not only make the process smoother but will also result in stunning, long-lasting creations. So, gear up with your brushes and let your JB Weld projects become a testament to your skill and creativity.
Frequently Asked Questions About Painting JB Weld
Embarking on a painting project with JB Weld opens up a realm of creative possibilities. However, it’s natural to have questions about the process. Let’s address some common queries to guide you through the journey of enhancing JB Weld surfaces with a splash of color.
1. Can JB Weld Be Painted?
Yes, JB Weld can be painted, and it’s a fantastic way to add a personalized touch to your projects. The key is to choose the right type of paint and follow proper preparation and application techniques.
2. What Type of Paint Should I Use?
Opt for high-quality, oil-based paints for the best results. These paints offer superior adhesion to JB Weld surfaces and ensure a durable finish.
3. Do I Need to Sand the JB Weld Surface Before Painting?
Yes, surface preparation is crucial. Lightly sand the JB Weld surface to remove any contaminants and enhance the paint’s ability to adhere for a smoother finish.
4. Can I Use Water-Based Paints on JB Weld?
While it’s possible, water-based paints may not adhere as well as oil-based alternatives. For optimal results, choose oil-based paints for painting JB Weld.
5. How Many Coats of Paint Should I Apply?
Instead of a single heavy coat, apply multiple thin coats for better adhesion and a more professional finish. Allow each coat to dry completely before applying the next.
6. Should I Use a Primer Before Painting JB Weld?
Yes, using an epoxy primer is recommended. It creates a bonding layer between JB Weld and the paint, enhancing adhesion and ensuring a lasting finish. (See Also: How Soon Can You Paint Over Epoxy Primer? Expert Tips Revealed)
7. What’s the Best Temperature for Painting JB Weld?
Ideal painting conditions range between 60°F and 75°F (15°C to 24°C). Extreme temperatures can affect paint application and drying times.
8. Can I Paint Over Already Painted JB Weld?
Yes, you can paint over already painted JB Weld surfaces. Ensure the existing paint is in good condition, clean the surface, and follow standard painting procedures.
9. How Long Does it Take for Painted JB Weld to Cure?
The curing time varies based on factors like temperature and humidity. Generally, allow at least 24 hours for the paint to cure before subjecting the surface to stress or contact.
10. What if the Paint Starts Peeling?
Peeling paint may indicate inadequate surface preparation or using an incompatible paint type. Address the root cause, redo the process if necessary, and ensure proper adhesion.
Navigating the world of painting JB Weld may seem complex, but armed with these answers, you’ll approach your projects with confidence. Transforming your JB Weld creations into vibrant, customized masterpieces is a rewarding journey that begins with the right knowledge and techniques.
Conclusion
In conclusion, painting JB Weld isn’t just a possibility; it’s a creative endeavor waiting to unfold. By following the right steps, choosing quality materials, and infusing your personal touch, you can turn ordinary JB Weld surfaces into customized, aesthetically pleasing masterpieces.
So, can you paint JB Weld? Absolutely! Now, armed with knowledge and a paintbrush, venture into the world of possibilities and add a splash of color to your JB Weld projects. Let your creativity flow and watch as your JB Weld creations become unique expressions of your artistic vision. Happy painting!