Car customization is more than just a hobby; it’s an expression of individuality. Plasti Dip has emerged as a go-to solution for those seeking a temporary yet impactful transformation. In this detailed guide, we’ll explore the ins and outs of Plasti Dipping door handles, providing you with the knowledge and confidence to embark on this exciting journey.
Unveiling the Magic of Plasti Dip
What Makes Plasti Dip Special?
Plasti Dip, initially designed for industrial applications, has found a welcoming home in the realm of DIY automotive projects. Its unique rubberized formula offers a peelable and flexible coating, making it an excellent choice for those looking to experiment with their car’s appearance without committing to a permanent change.
The Wide Spectrum of Plasti Dip Colors and Finishes
One of the key attractions of Plasti Dip is the extensive range of colors and finishes available. From classic matte black to vibrant neons and metallics, the options are nearly limitless. Whether you’re aiming for a subtle enhancement or a bold statement, there’s a Plasti Dip color to suit every taste.
Getting Started: Essential Tools and Materials
1. Plasti Dip Products
Before diving into the project, ensure you have the right Plasti Dip products. You can choose between Plasti Dip spray cans or the liquid version, depending on your preference and the desired finish.
2. Painter’s Tape and Masking Materials
Creating clean lines is crucial for a professional-looking result. Invest in quality painter’s tape to mask off areas you don’t want to be coated.
3. Cleaning Supplies
Proper surface preparation is key. Clean the door handles thoroughly with soap, water, and a microfiber cloth to remove any dirt, grease, or residue.
4. Fine-Grit Sandpaper
Give the door handles a gentle sanding to promote better adhesion. This step ensures a smooth surface for the Plasti Dip to adhere to.
Step-by-Step Plasti Dip Application
1. Prepare Your Work Area
Choose a well-ventilated space for your project. If possible, work in a garage or outdoors to minimize the inhalation of fumes. Ensure the car is parked on a level surface.
2. Remove or Mask Off Door Handles
While it’s not mandatory, removing the door handles provides easier access and a more even coating. If you choose not to remove them, mask off the surrounding areas with painter’s tape.
3. Thoroughly Clean the Door Handles
Take the time to clean the door handles meticulously. A clean surface ensures better adhesion and a more durable finish.
4. Gentle Sanding for Better Adhesion
Using fine-grit sandpaper, lightly sand the door handles. This step is especially crucial for older cars or those with existing paint damage.
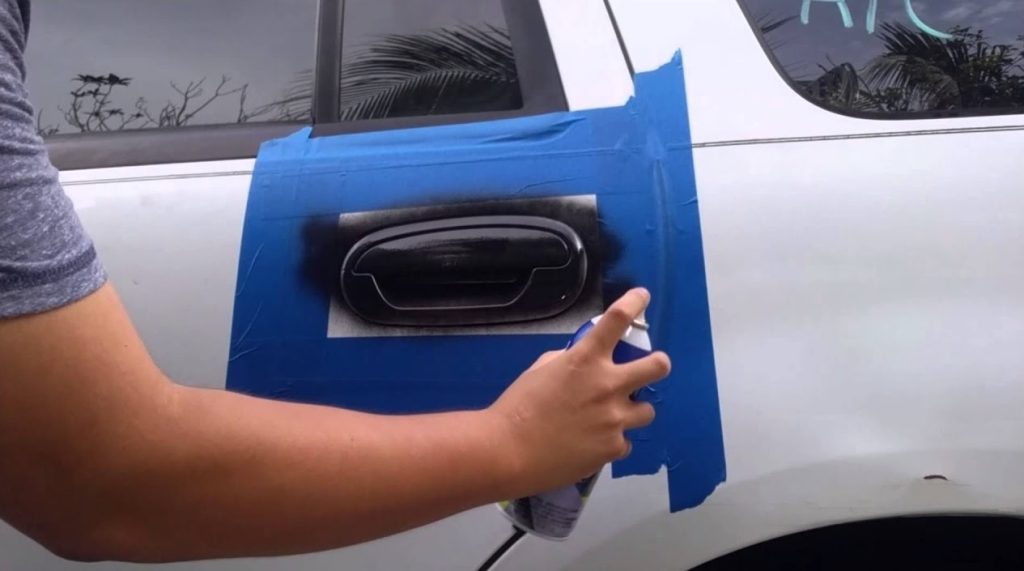
5. Spray on the Plasti Dip
Shake the Plasti Dip can vigorously to ensure an even mix. Hold the can 6-8 inches away from the surface and apply the first coat. Remember, multiple thin coats are preferable to a single thick coat.
6. Allow Each Coat to Dry
Patience is crucial. Let each coat dry completely before applying the next one. This prevents drips and ensures a smoother finish.
7. Optional: Add More Layers
Depending on your desired look, you can apply additional layers for a thicker coating or more intense color. Ensure each layer is dry before proceeding.
8. Let It Cure Completely
After applying the final coat, let the Plasti Dip cure for at least 24 hours before handling the door handles. This ensures the coating has fully bonded to the surface.
9. Reattach Door Handles (If Removed)
Carefully reattach the door handles, ensuring they are securely in place. Take your time to avoid damaging the freshly applied Plasti Dip. (See Also: Can You Plasti Dip Door Jambs? A Step-by-Step Guide for a Professional Finish)
Benefits of Plasti Dipping Your Door Handles
1. Reversibility: A Change Without Commitment
One of the most significant advantages of Plasti Dip is its peelable nature. If you ever decide to return to the original look, simply peel off the coating without harming the underlying surface.
2. Cost-Effective Customization
Compared to traditional painting methods, Plasti Dip is a cost-effective way to customize your car. It provides a professional-looking finish without breaking the bank.
3. Versatility in Expression
With a vast array of colors and finishes, Plasti Dip allows you to express your personality and style. Experiment with different combinations to achieve a look that stands out.
Tips and Tricks for a Flawless Plasti Dip Job
1. Mind the Temperature
Ideal application temperature is between 70-90°F (21-32°C). Applying Plasti Dip in extreme temperatures can affect the drying process and the final result.
2. Even, Light Coats Are Key
Avoid the temptation to apply a thick coat in one go. Multiple thin coats result in a smoother and more professional finish.
3. Experiment with Colors
Mix and match Plasti Dip colors to create a custom look. Consider using contrasting colors for a bold and eye-catching effect.
Exploring the Creative Possibilities
Plasti Dip isn’t limited to door handles alone. Car enthusiasts have used this versatile coating to transform various parts of their vehicles, including:
- Grilles
- Emblems
- Rims
- Side Mirrors
Feel free to experiment and discover how Plasti Dip can elevate your car’s aesthetics.
Expert Tips for Perfectly Plasti Dipped Door Handles
When it comes to Plasti Dipping your car’s door handles, a few expert tips can make all the difference between a good and a truly outstanding result. Let’s delve into some insider knowledge to ensure your DIY project goes off without a hitch.
1. Precision is Paramount
Achieving clean lines is essential for a professional-looking finish. Take the time to mask off surrounding areas with precision, using high-quality painter’s tape to define the edges of the project.
2. Temperature Control Matters
Plasti Dip is sensitive to temperature, and the weather can impact the drying process. Aim to apply the coating in moderate temperatures (70-90°F or 21-32°C) to ensure optimal results.
3. Master the Art of Layering
Rather than opting for a thick initial coat, embrace the technique of applying multiple thin layers. This not only prevents drips but also contributes to a smoother and more even finish.
4. Experiment with Color Combinations
Don’t shy away from mixing and matching Plasti Dip colors. Experimenting with color combinations can result in a unique and personalized look that sets your car apart from the rest.
5. Mindful Drying Time
Patience is a virtue in Plasti Dipping. Allow each coat to dry thoroughly before moving on to the next step. Rushing through this process can compromise the final outcome.
6. Consider Removing Door Handles
While optional, removing the door handles for the Plasti Dipping process provides better access and allows for a more uniform coating. If you choose this route, ensure a careful and secure reattachment.
7. Regular Maintenance for Longevity
To extend the life of your Plasti Dip coating, perform regular maintenance. Avoid harsh chemicals when cleaning and be mindful of abrasive materials that could scratch or damage the finish. (See Also: Can Primer Filler Go on Bare Metal? Tips for Proper Application)
8. Protect Against UV Rays
Plasti Dip is durable, but prolonged exposure to harsh sunlight can affect its longevity. Consider using a UV-resistant clear coat to provide an extra layer of protection against the sun’s rays.
9. Practice on Small Surfaces First
If you’re new to Plasti Dipping, consider practicing on smaller surfaces before tackling the door handles. This allows you to familiarize yourself with the application process and build confidence.
10. Invest in Quality Plasti Dip Products
The quality of the Plasti Dip product you choose can significantly impact the results. Invest in reputable brands and ensure the product is suitable for automotive applications.
11. Personalize Beyond Door Handles
Once you’ve mastered the art of Plasti Dipping door handles, consider expanding your customization to other parts of the car. Embrace the versatility of Plasti Dip on grilles, emblems, rims, and side mirrors.
12. Document Your Process
Capture the various stages of your Plasti Dipping journey. Not only does this serve as a visual record of your project, but it also allows you to identify areas for improvement in future endeavors.
13. Consult Online Communities
Engage with online forums and communities dedicated to car customization. Learning from the experiences of others can provide valuable insights and troubleshooting tips for your Plasti Dipping project.
14. Use a Respirator for Safety
While Plasti Dip is generally safe to use, it’s advisable to wear a respirator to protect against fumes, especially when working in enclosed spaces. Safety should always be a top priority.
15. Customize for the Seasons
Consider adapting your Plasti Dip choices to the seasons. Bright, vibrant colors might suit the summer vibe, while more subdued tones could complement the winter aesthetic.
Incorporating these expert tips into your Plasti Dipping adventure ensures not only a successful project but also a uniquely customized car that reflects your personality and style. Enjoy the process, and let your creativity shine!
Plasti Dipping Door Handles FAQs: Your Ultimate Guide
Embarking on a Plasti Dipping project for your car’s door handles may spark some questions. Fear not! This FAQ section is here to address common queries, ensuring you have all the information you need to achieve a flawless finish.
Can You Plasti Dip Door Handles Without Removing Them?
Absolutely! While removing door handles provides easier access, it’s not mandatory. Using painter’s tape to mask off the surrounding areas ensures a clean finish without the need for removal.
How Long Does Plasti Dip Last on Door Handles?
The durability of Plasti Dip on door handles depends on factors like application technique, weather conditions, and maintenance. With proper application and care, it can last several years. Regular touch-ups can extend its life.
Can I Plasti Dip Over Existing Paint?
Yes, Plasti Dip can be applied over existing paint. Ensure the surface is clean, dry, and free from contaminants for optimal adhesion. The peelable nature of Plasti Dip allows for easy removal if needed.
Is Plasti Dip Easy to Remove from Door Handles?
Absolutely. One of the advantages of Plasti Dip is its peelable nature. If you ever want to revert to the original look or change the color, simply peel off the coating without damaging the underlying surface.
Can I Mix Different Plasti Dip Colors for a Custom Look?
Certainly! Mixing Plasti Dip colors allows you to create a unique and personalized look for your door handles. Experiment with combinations to achieve the desired aesthetic. (See Also: Is Auto Butler Worth It? Uncovering the Benefits and Drawbacks)
How Many Coats of Plasti Dip Should I Apply?
For door handles, apply multiple thin coats rather than a single thick coat. This ensures an even finish, prevents drips, and promotes better adhesion. Aim for at least four to five coats, allowing each to dry between applications.
What Precautions Should I Take When Using Plasti Dip?
Ensure proper ventilation when working with Plasti Dip, especially in enclosed spaces. Use a respirator to protect against fumes. Work in a well-lit area, away from open flames or sparks.
Can Plasti Dip Handle Extreme Temperatures?
Plasti Dip is designed to withstand a range of temperatures. However, prolonged exposure to extreme heat or cold can affect its longevity. Applying Plasti Dip in moderate temperatures is ideal for optimal results.
Should I Clear Coat Plasti Dip on Door Handles?
While Plasti Dip is peelable on its own, adding a clear coat can provide extra protection against UV rays and enhance durability. Opt for a clear coat specifically designed for use with Plasti Dip.
Can I Plasti Dip Other Parts of My Car Besides Door Handles?
Absolutely! Plasti Dip is versatile and can be applied to various car parts, including grilles, emblems, rims, and side mirrors. It offers a cost-effective way to customize your entire vehicle.
How Do I Maintain Plasti Dipped Door Handles?
Maintaining Plasti Dip is simple. Clean the handles with a mild soap and water solution. Avoid harsh chemicals and abrasive materials. Regular maintenance helps prolong the life of the coating.
Does Plasti Dip Come in Glossy Finishes?
While Plasti Dip is known for its matte finish, glossy top coats are available to achieve a glossier look. Applying a glossy clear coat over the Plasti Dip can enhance its shine.
Can I Use Plasti Dip on a Brand-New Car?
Yes, Plasti Dip is safe to use on brand-new cars. However, check with the manufacturer or dealership regarding warranties and ensure the paint is fully cured before applying Plasti Dip.
How Do I Fix Imperfections in Plasti Dip on Door Handles?
If you notice imperfections like bubbles or uneven areas, you can peel off the affected section and reapply the Plasti Dip. Applying additional coats may also help even out the finish.
Where Can I Find Inspiration for Plasti Dip Designs?
Online communities, forums, and social media platforms dedicated to car customization are excellent sources of inspiration. Explore different designs, color combinations, and techniques to spark your creativity.
Now armed with answers to these frequently asked questions, you’re ready to embark on your Plasti Dipping journey with confidence. Happy customizing!
In Conclusion: Embrace the DIY Spirit
In the world of car customization, the journey is as important as the destination. Plasti Dipping door handles is a rewarding DIY project that allows you to showcase your creativity. Whether you’re a seasoned enthusiast or a first-time DIYer, this guide equips you with the knowledge to embark on a transformative journey. So, can you Plasti Dip door handles? Absolutely! Unleash your imagination and give your car the personalized touch it deserves.